


Logging On to ARCHER
This guide covers requesting a new ARCHER password via SAFE, retrieving the new password once set, setting up an SSH key pair, and using the combination to log on to ARCHER.
When the ARCHER Service was resumed following the worldwide security issue in summer 2020, both ssh key pair (protected by a passphrase) and password are required to log on.
Users are required to use an academic email address i.e. one that ends .ac.uk or for commercial users, an email address using the domain of their company. Users currently using e.g. a gmail, yahoo or similar address must first update their email address in SAFE. If you do not have access to an academic or professional email address, please contact the service desk for advice.
Access to ARCHER is restricted only to users with an .ac.uk email domain - users with other email domains should contact the service desk to arrange approval of their email address.
- Log in to SAFE
- Request a new machine account password
- Generate an SSH key
- Upload the SSH key via SAFE
- Collect your ARCHER password
- Connect to ARCHER
1. Log in to SAFE
1.1 Log in to SAFE when you know all your details
- Go to the SAFE https://www.archer.ac.uk/safe/ (if you have forgotten your SAFE password, go here)
- Type in the email address you have registered with
- Type in your SAFE password
- Click "Login"
- You are now on the Main Page and here you can see Menus along the top which give access to SAFE functionality
1.2 How to request a new SAFE password
Note: there is no requirement to reset you SAFE password due to the recent security incident - this step is only necessary if you have forgotten your SAFE password.
Go to https://www.archer.ac.uk/safe/. Then:
- Click Forgot password?
- Enter your email address
- SAFE will mail you a link - when you click on the link you will be able to set a new SAFE password
Of course, anyone could go to SAFE, type your email address and request a new password by clicking "Forgot password?". If that happens you will receive an email message out of the blue with a link to change the password - if you don't click the link then no changes will be made.
1.3 How to change your SAFE password
Note: there is no requirement to reset you SAFE password due to the recent security incident - this step is only necessary if you have forgotten your SAFE password.
Login to SAFE. Then:
- Go to the Menu Your details and select Change SAFE password
- Fill in the boxes and click Change
1.4 How to find out which email address you have registered for SAFE
If you have forgotten which email address you used to register for SAFE, you should contact the service desk and state the machine username and details of your institution. The helpdesk can then trigger a new password request to the email you used to register.
1.5 How to change your email address on SAFE
Login to SAFE. Then:
- Go to the Menu Your details and select Update email
- Enter the new email address and click Request
A verification email will then be sent to the new email address. This email contains a link which you must use to verify your new address. On acknowledging your new address the change will be committed and you must use the new email address when logging into SAFE
1.6 What if you no longer have access to the email address registered in SAFE
If you have changed email addresses since you last used SAFE and no longer have access to your old email account, and no longer remember your SAFE password, please contact the service desk and give them the details of your username, previous and current institutions and a contact phone number.
They will be able to update your details in SAFE. Please do not just sign up for a new SAFE account as this will not be linked to your existing machine accounts.
2. Request a new machine account password
Login to SAFE. Then:
- Go to the Menu Login accounts and select the account you need the new password for which displays details of this service machine account.
- Click Request Password Reset towards the bottom of the screen.
Now the systems team will change your password. When this has been done, you will be informed by email; this means that you can come back to SAFE and pick up your new password.
While you are waiting for your new password, you can setup your SSH key pair and upload the public key to SAFE. We describe how to do this in the next section.
3. Generate an SSH key pair protected by a passprase
An SSH key pair is an additional method of authentication that consists of two parts (hence "key pair"):
- A private key (or identification) which is protected by a passphrase. This should be kept safe and never shared with anyone else or uploaded to any type of shared or online storage.
- A public key which is uploaded to the remote systems you want to access (in the case of ARCHER this will be uploaded via the SAFE, see below).
How you generate your SSH key pair depends on which operating system you use on your laptop/workstation that you are using to access ARCHER. We provide three sets of instructions below: for macOS/Linux, for Windows using MobaXterm (should work for all versions of Windows) and for Windows using Powershell (this method will only work on recent versions of Windows 10).
- 3.1 Generate an SSH key pair on MacOS or Linux
- 3.2 Generate an SSH key pair on Windows using MobaXterm or PuTTYgen
- 3.3 Generate an SSH key pair on Windows using OpenSSH in Powershell
3.1 Generate an SSH key pair on MacOS or Linux
3.1.1. Open your terminal application.
On macOS this is the "Terminal" application found from the Applications menu or via Spotlight search. On Linux, you should use the flavour of terminal for your distribution (for example, on Ubuntu, it is an application called "Terminal").
3.1.2. Generate a key pair
In the terminal, use the "ssh-keygen" command to generate a key pair. We will add options to set the type of the key pair to RSA, increase the cryptographic strength of the key pair to 4096 bits and to add a comment to the key pair to aid identification in the future. For example:
ssh-keygen -t rsa -b 4096 -C "ARCHER access"
3.1.3. Give your key a filename
Press "Return/Enter" to accept the default.
Enter file in which to save the key (/Users/auser/.ssh/id_rsa):
3.1.4. You will be asked to enter a passphrase.
Choose a strong passphrase. See advice at NCSC. (Do not be tempted to accept no passphrase as this will make your ARCHER account insecure.) Note: you will not see any characters appear in the terminal as you type your passphrase.
Enter passphrase (empty for no passphrase):
Enter same passphrase again:
3.1.5. Once you have chosen your passphrase
You should see output similar to:
Your identification has been saved in /Users/auser/.ssh/id_rsa.
Your public key has been saved in /Users/auser/.ssh/id_rsa.pub.
The key fingerprint is:
SHA256:MW+/4eW9KUBtTwO8884PQanjZ1nOsHENoNQclGl5CnI ARCHER access
The key's randomart image is:
+---[RSA 4096]----+
|          .+==   |
|        ..E.B+.. |
|        oo.o.o*  |
|         + ..B +.|
|        S + + O =|
|         . + . & |
|            = X o|
|           . O =.|
|            o oo=|
+----[SHA256]-----+
The public key file, in this case "/Users/auser/.ssh/id_rsa.pub" is the part that you will upload to SAFE to associate with your ARCHER machine account (see the Upload public key to SAFE section below). Remember: your private key should never be shared with anyone else or uploaded to any type of shared or online storage.
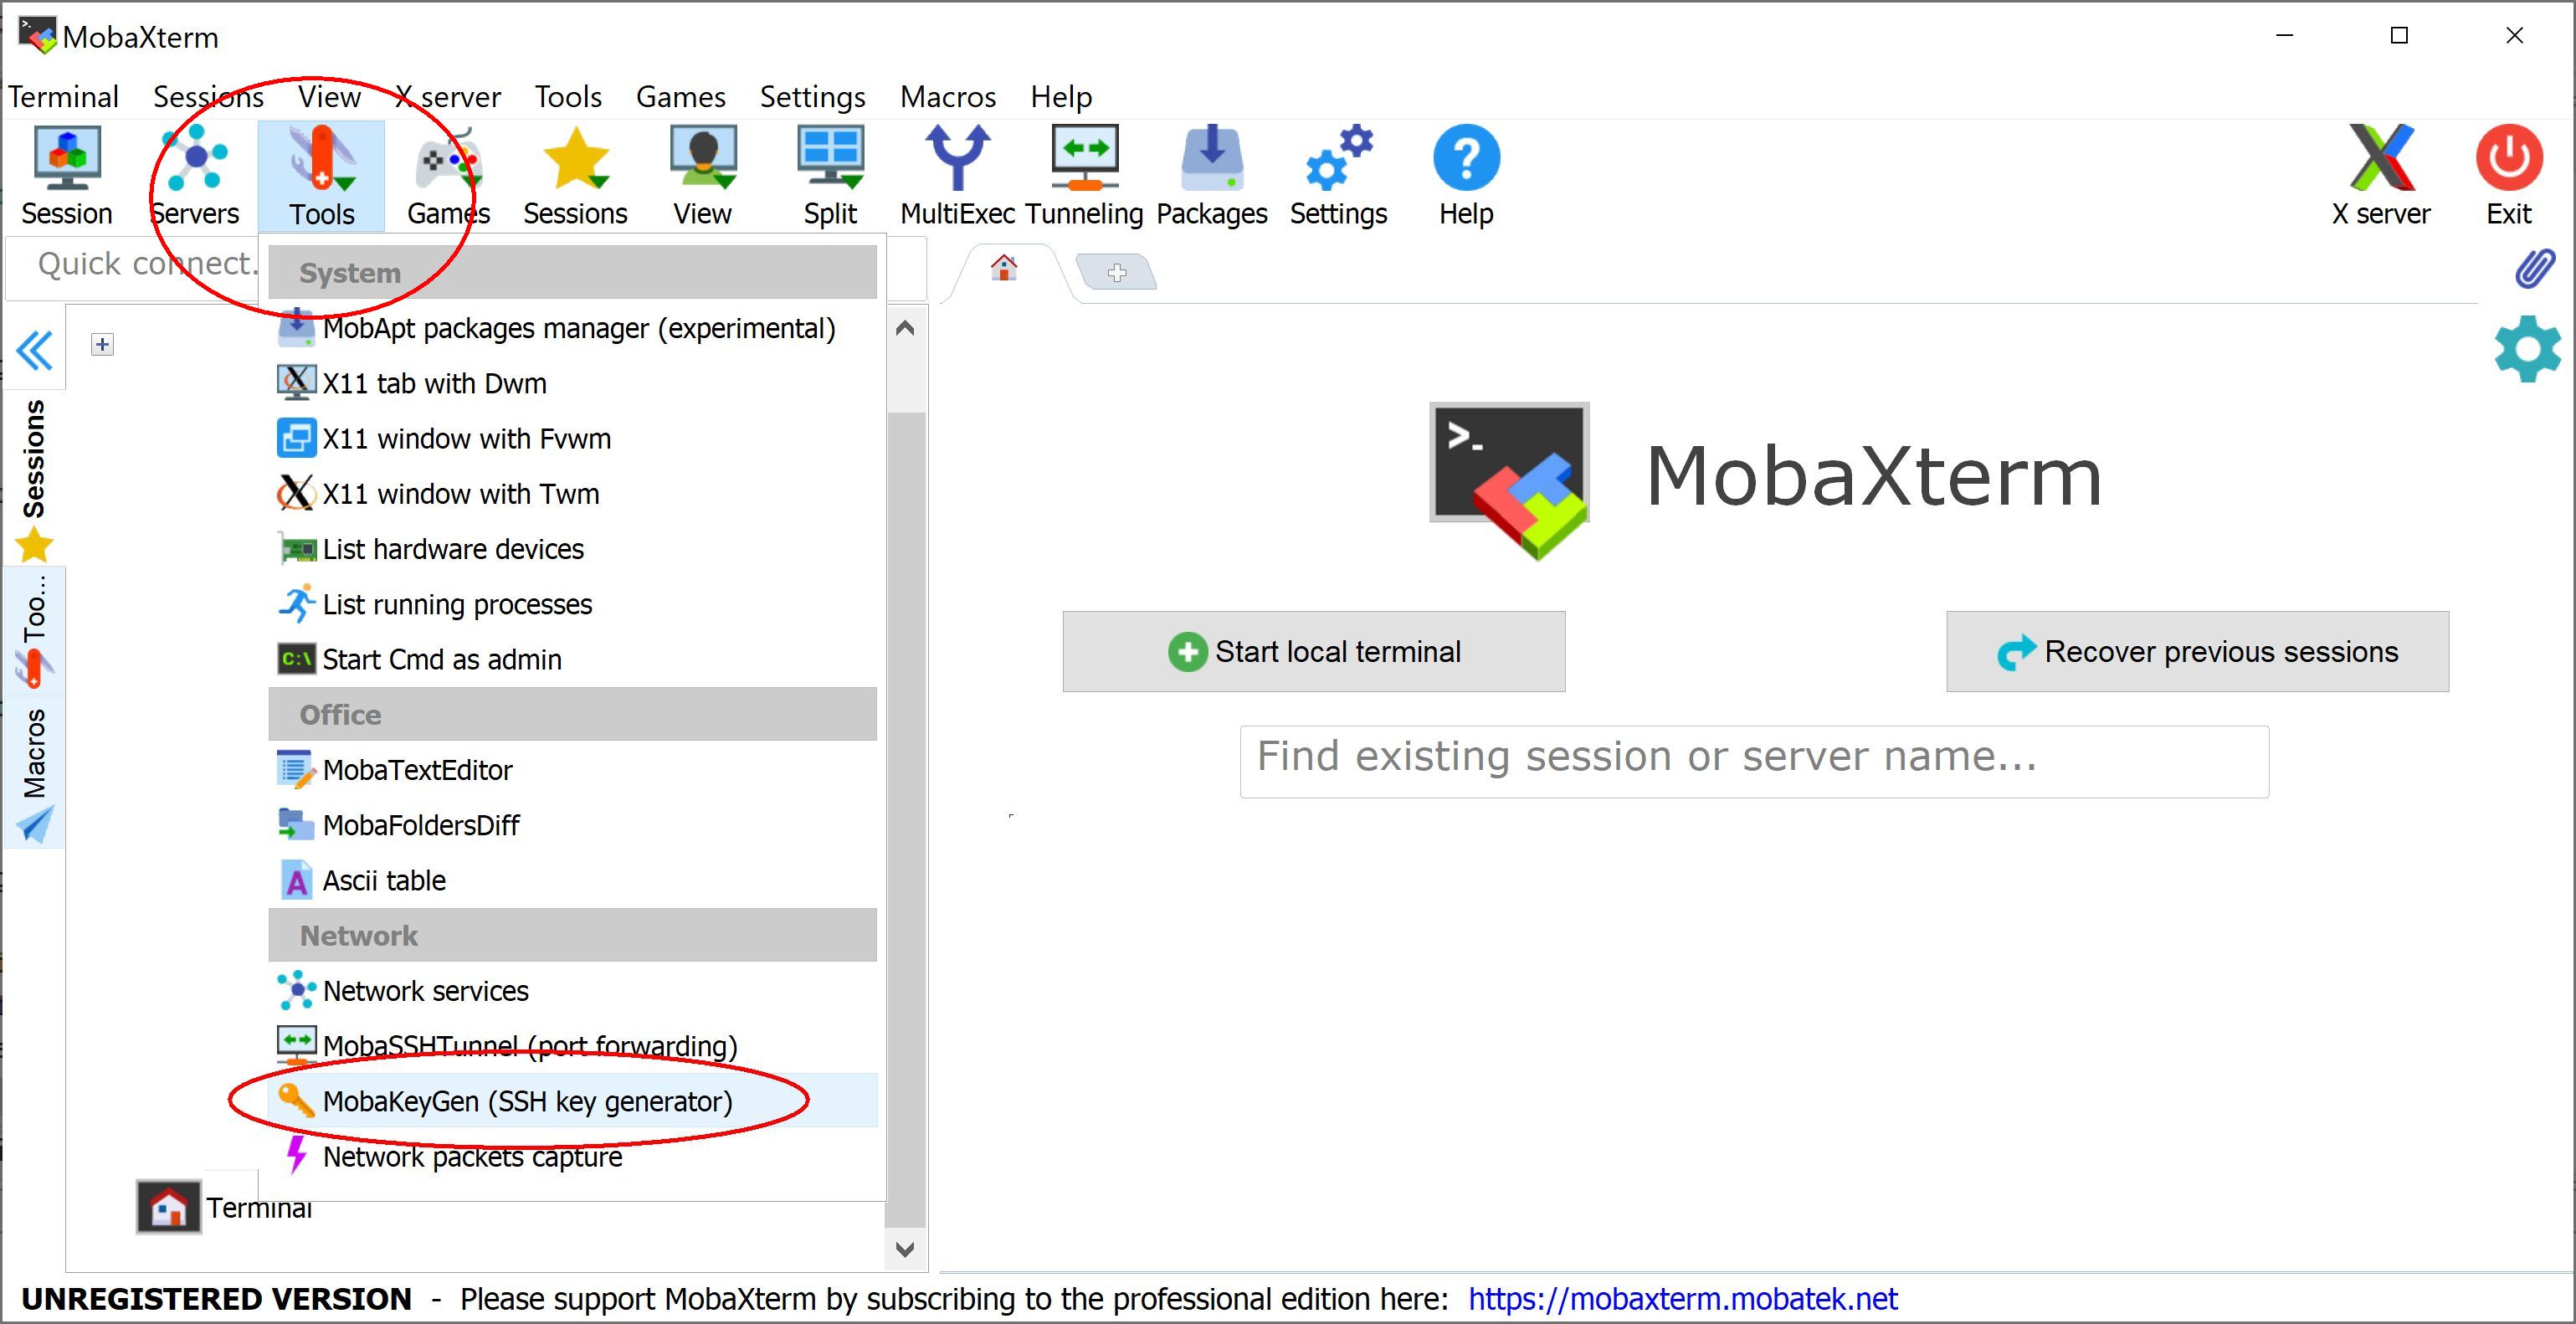
3.2 Generate an SSH key pair on Windows using MobaXterm or PuTTYgen
![]()
Note that PuTTYgen uses an amost identical interface to MobaKeyGen
and can also be use to generate the SSH key pair.
3.2.1. Generating a Public/Private key pair
To generate an SSH key pair, start the MobaXterm SSH Key Generator (MobaKeyGen) found under the MobaXterm Tools menu, or start PuTTYgen.

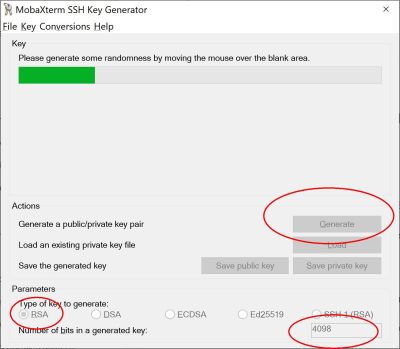
Under 'type of key to generate' select RSA. We HIGHLY recommend you change the "Number of bits in a generated key:" from the default of 2048 to 4096 (last option at the bottom of the GUI). Then click the Generate button and move your mouse around the empty area at the top of the GUI. As you move your mouse around, you'll see the bar move across the window indicating it's working on generating your random, unique key.

3.2.2. Save the generated keys.
You should enter a passphrase for your private key in the "Key passphrase" box. Choose a strong passphrase. See advice at NCSC or you can use a full sentence (Do not be tempted to accept no passphrase as this will make your ARCHER account insecure.) This ensures that if your key is stolen, somebody else would need the passphrase associated with the key to utilize it.
Changing the default "Key comment" will help you to identify the key later.
Then click "Save public key" and then "Save private key" - the file location of the private key MUST be a place that only you have access to. Remember: your private key should never be shared with anyone else or uploaded to any type of shared or online storage. Be aware: the default location is often the Windows Documents folder - this is often set to auto-backup to One Drive so this is NOT a good location for your private key.
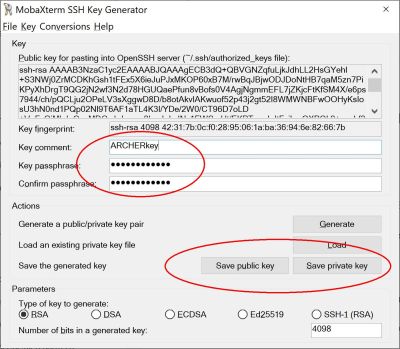

IMPORTANT: Make sure to save the private key with an extension of .ppk - if you don't this won't work when trying to connect using MobaXterm.
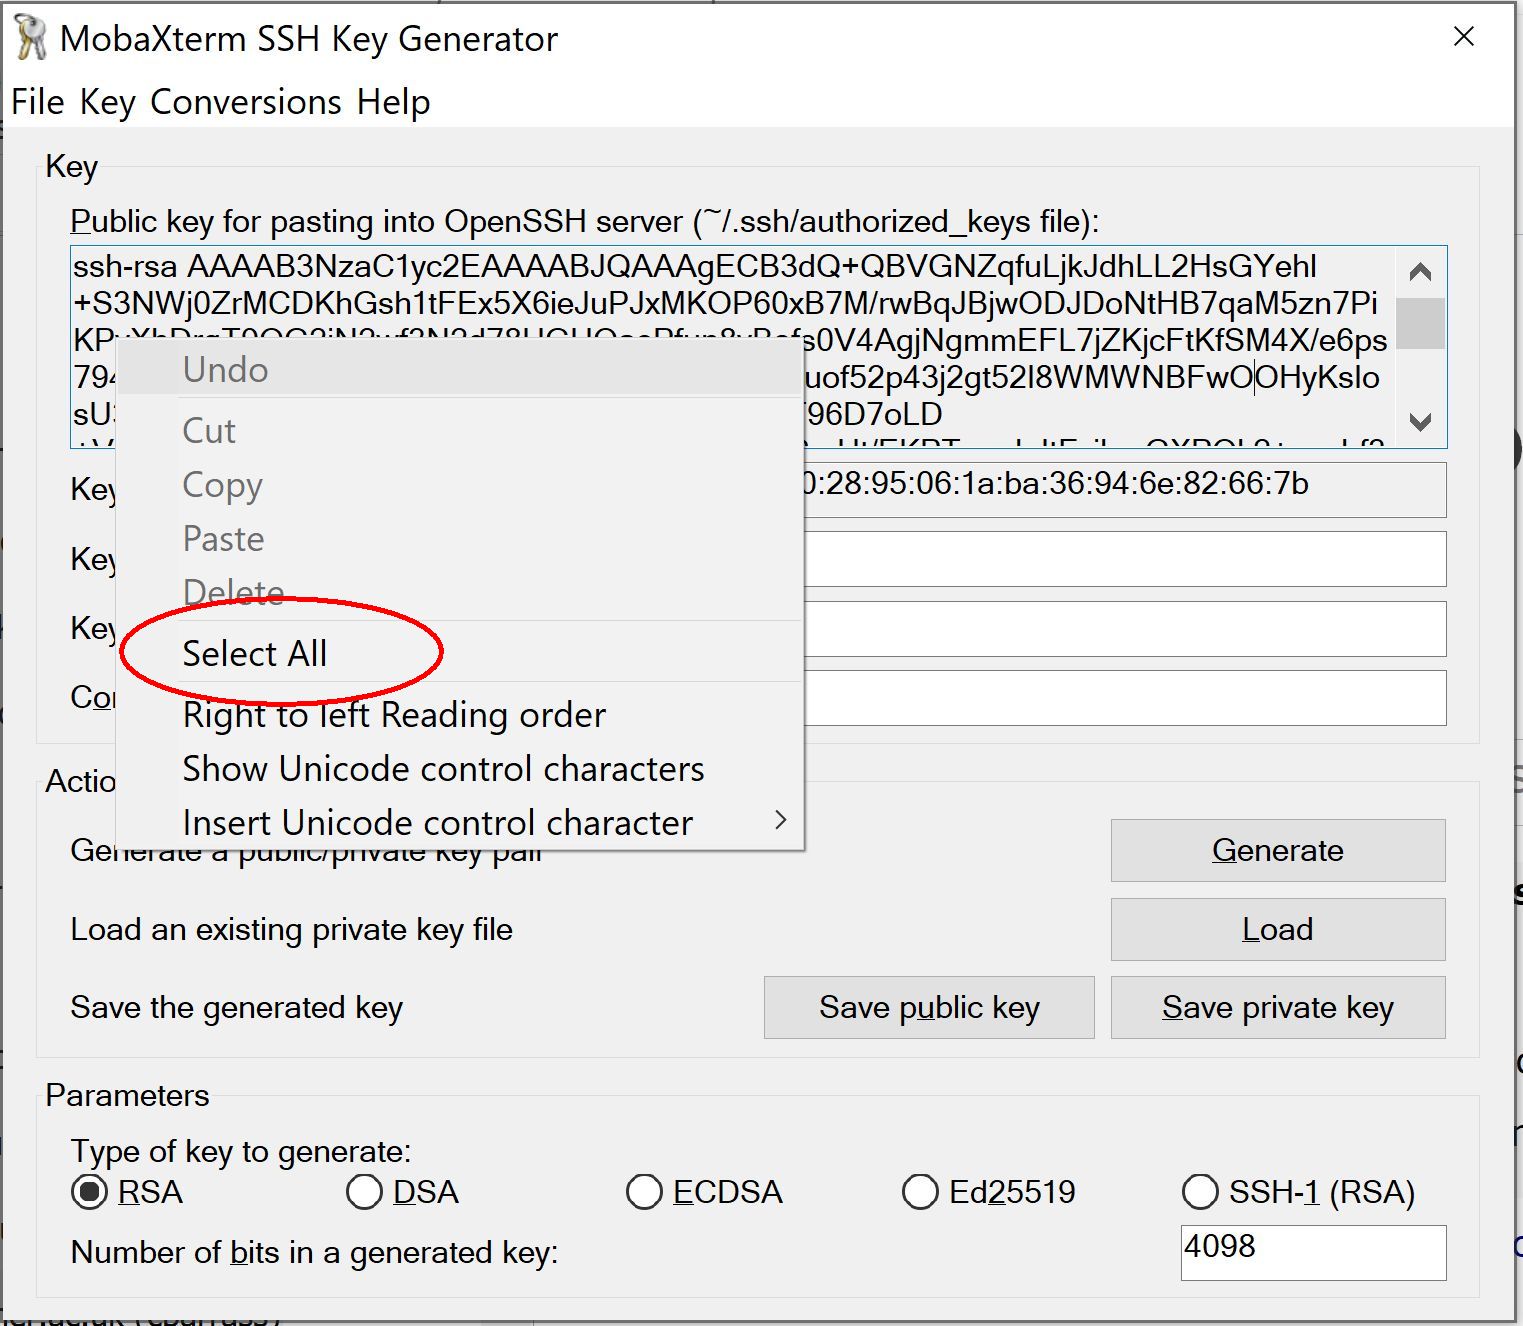
If you want to paste the public key into SAFE for upload to ARCHER then you should use right-click "Select all" and then right-click "Copy" to ensure you capture the entire key string.
Now edit the MobaXterm session for your ARCHER connection, and add the private key into MobaXterm by selecting "Advanced SSH settings", tick Use private key and navigate to the private key file you saved.
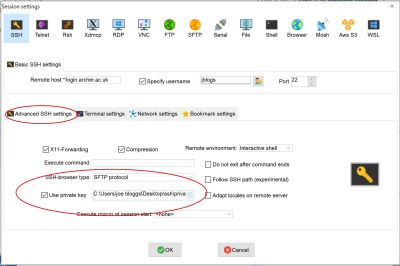
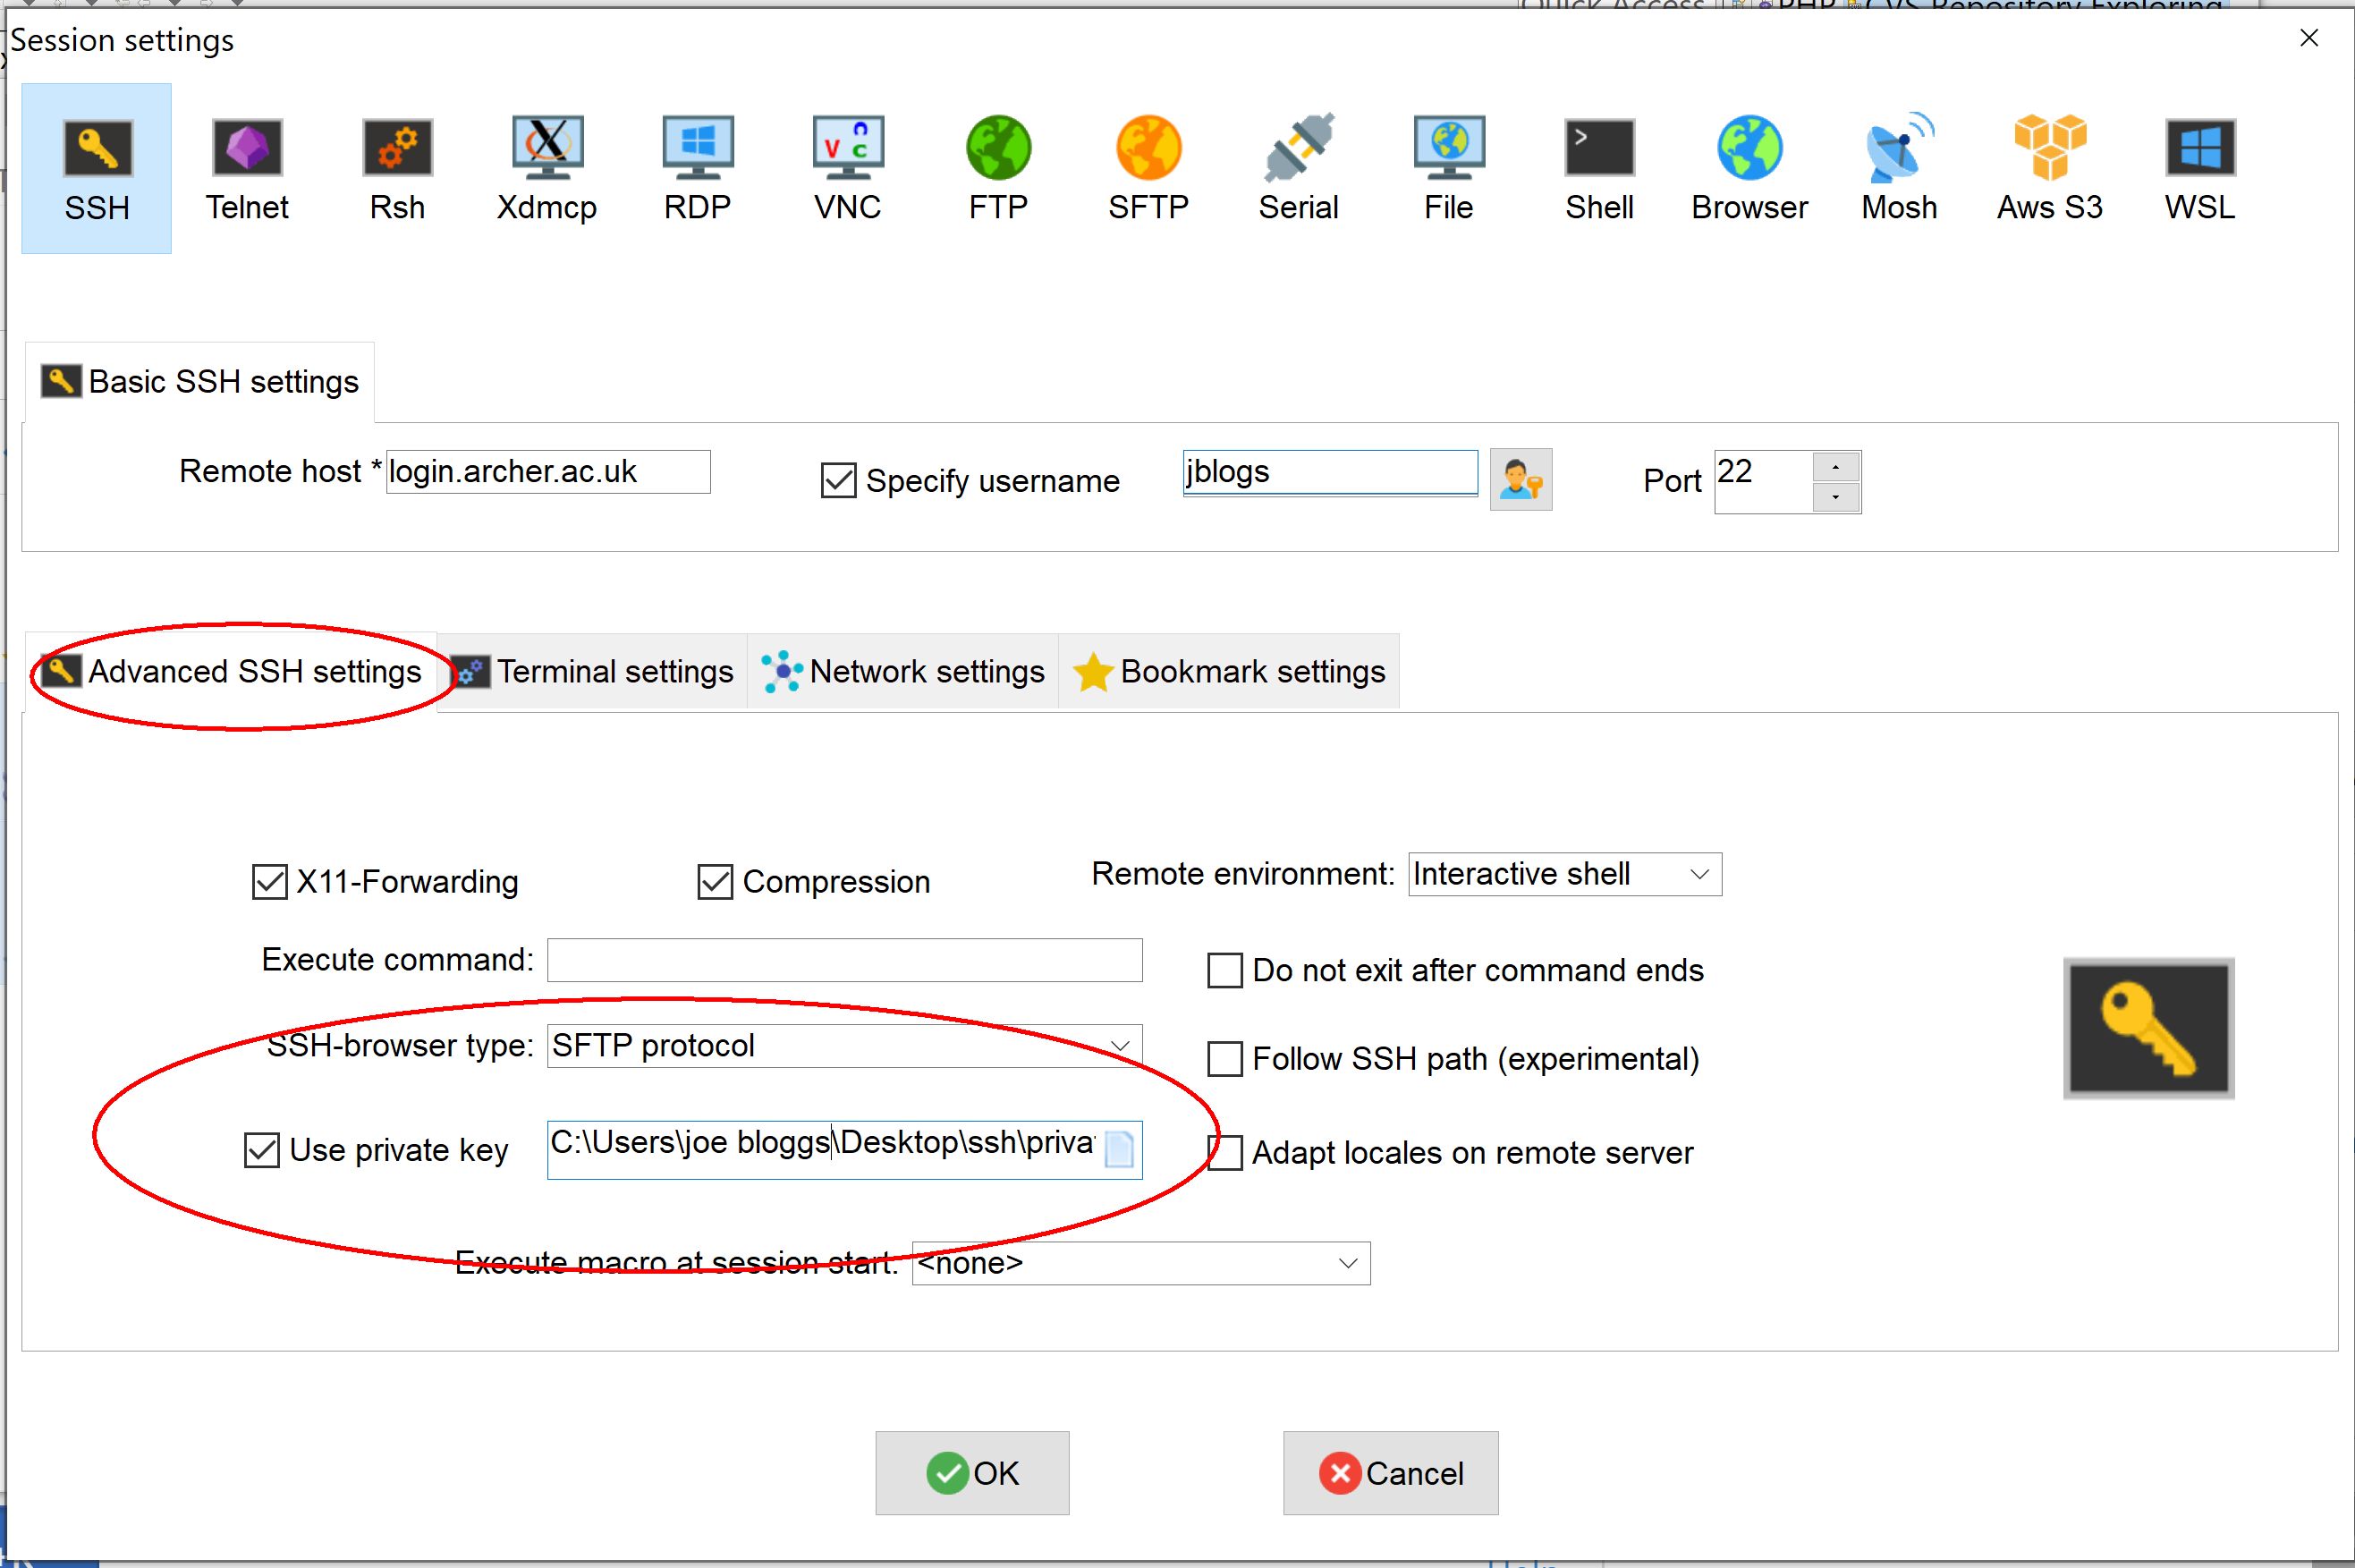
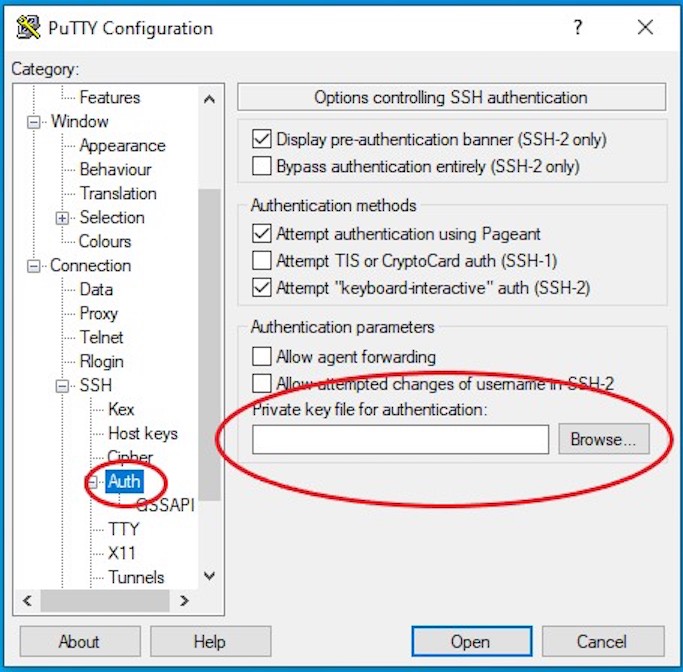
For PuTTy / PuTTYGen, in PuTTY go to SSH Auth to add the private key.
3.3 Generate an SSH key pair on Windows using OpenSSH in Powershell
![]()
OpenSSH was added to Windows 10 in 2018.
if the Windows version is more recent than this then
keys can be created and shared from PowerShell with just a few commands
Before starting, check that the "ssh-keygen" command is available in PowerShell.
Use the command 'Get-command' e.g.
Get-command ssh-keygen
You should see
CommandType     Name                                               Version    Source

-----------     ----                                               -------    ------
Application     ssh-keygen.exe                                     7.7.2.1    C:\WINDOWS\System32\OpenSSH\ssh-keygen.exe
3.3.1. Generate an SSH key pair
Use the "ssh-keygen" command to generate a key pair. We will add options to set the type of the key pair to RSA, increase the cryptographic strength of the key pair to 4096 bits and to add a comment to the key pair to aid identification in the future:
ssh-keygen -t rsa -b 4096 -C "ARCHER access"
This will ask you for filename for the key: press "Return/Enter" to accept the default.
Enter file in which to save the key (C:\Users\Jane Doe/.ssh/example_key):
You will then be asked to enter a passphrase.
Choose a strong passphrase. See advice at NCSC or you can use a full sentence (Do not be tempted to accept no passphrase as this will make your ARCHER account insecure.) Note: you will not see any characters appear in the terminal as you type your passphrase.
Enter passphrase (empty for no passphrase):
Enter same passphrase again:
3.3.2. You should see output similar to:
Your identification has been saved in C:\Users\Jane Doe/.ssh/example_key.
Your public key has been saved in C:\Users\Jane Doe/.ssh/example_key.pub.
The key fingerprint is:
SHA256:vw0ieJ5nxHcl8HzQXjD5tv9pEzKcozOC/r5ZgpWaT24 ARCHER access
The key's randomart image is:

+---[RSA 2048]----+
|             .oo |
|          . . o..|
|           + o o |
|          . + + o|
|       .So  .+...|
|     .  B.. .* o |
|    . o=o+oo. + o|
|     o +*E+B   oo|
|      +++B+ + ..+|
+----[SHA256]-----+
The public key file, in this case "C:\Users\Jane Doe/.ssh/example_key.pub" is the part that you will upload to SAFE to associate with your ARCHER machine account (see the Upload public key to SAFE section below). Remember: your private key should never be shared with anyone else or uploaded to any type of shared or online storage.
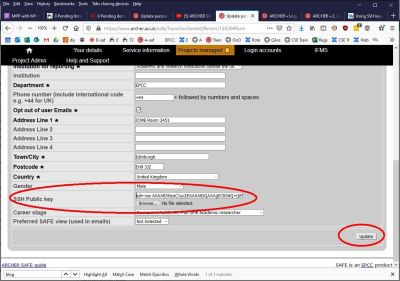
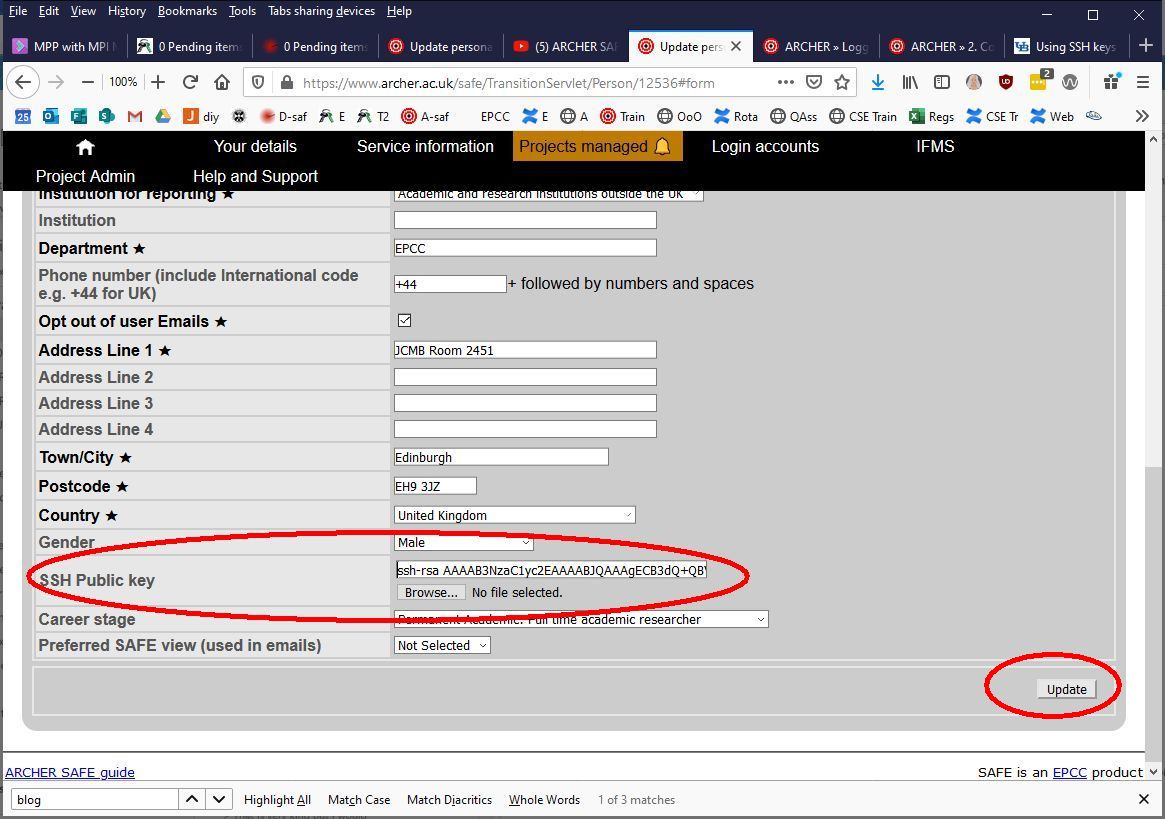
4. Upload the SSH key via SAFE
- Login to SAFE at: https://www.archer.ac.uk/safe/
- Go to the Menu Your details
- Click Update personal details near bottom of page
-
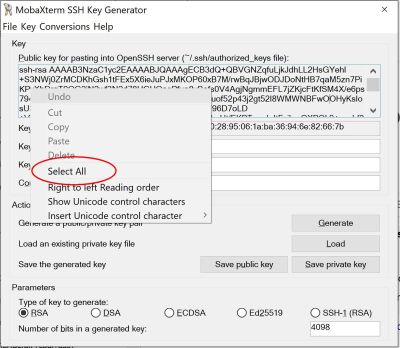
Paste the public key string into the SSH Public key field
(the key string is in your public key file and starts "ssh-rsa..." and you must select and copy ALL of it - use right-click 'Select All' to be sure)
- Click Update button bottom right to trigger the upload of the public key to ARCHER. (SAFE will verify the key format when it is imported. If SAFE gives an error for the format of the key, check you selected all of the key before pasting into the text box or that you have selected the correct file.)
The upload of the SSH public key does require manual intervention by the systems team so please allow a short while (about 10-20 minutes at least) before you try to log on. No confirmation is sent for this, so you don't need to wait for an email. You cannot upload a new SSH public key until any earlier upload request has been completed.
5. Collect your ARCHER password
Wait until you have received the email confirming that your new password has been set by our systems team; if you try to retrieve it before they have sent the email, the password you retrieve will be an old, expired one.
- Login to SAFE at: https://www.archer.ac.uk/safe/
- Go to the Menu Login accounts and select the account you need the new password for
- Click View Login Account Password towards the bottom of the screen.
- This will display your password as set by the systems team.
This password is generated randomly by software. It's best to copy-and-paste it across when you log in to the service machine (ARCHER).
6. Connect to ARCHER
Start your connection to ARCHER using whichever ssh method you usually use - often
this is Terminal on MacOS or Linux, and MobaXTerm or Putty for Windows
![]()
You will be prompted to enter the passphrase for your SSH Key
Once the SSH key passprase has been accepted then you will be prompted to enter your password, as retrieved from SAFE
Next, you will be prompted to change your password from the one you retrieved from SAFE. This is a three-step process:
- When promoted to enter your ldap password: Re-enter the password you retrieved from SAFE
- When prompted to enter your new password: type in a new password which meets the password complexity requirements
- When prompted to re-enter the new password: re-enter the new password
Important: Do NOT re-use an old previously used password here. All the old passwords may have been compromised.
Note: when you change your password on the service machine in this way, this is not reflected on the SAFE. If you try to retrieve your password in SAFE again, it will still be the old, now defunct, auto-generated one.
You are now logged on to ARCHER
In future when you log on you will be prompted first for the SSH Key passprase and then for your password (that you set above)
SSH debugging tips
If you find you are unable to connect via SSH there are a number of ways you can try and diagnose the issue. Some of these are collected below - if you are having difficulties connecting we suggest trying these before contacting the ARCHER service desk. Can you connect to the login node?
Try the command
ping -c 3 login.archer.ac.uk
. If you successfully connect to the login node, the output should include:
--- login.dyn.archer.ac.uk ping statistics ---
3 packets transmitted, 3 received, 0% packet loss, time 38ms
(the ping time ‘38ms’ is not important). If not all packets are received there could be a problem with your internet connection, or the login node could be unavailable.
SSH key
If you get the error message Permission denied (publickey) this can indicate a problem with your SSH key. Some things to check:
- Have you uploaded the key to SAFE? Please note that if the same key is reuploaded SAFE will not map the “new” key to ARCHER. If for some reason this is required, please delete the key first, then reupload.
- Is ssh using the correct key? You can check which keys are being found and offered by ssh using
ssh -vvv. If your private key has a non-default name you can use the-iflag to provide it to ssh, i.e.ssh -i path/to/key username@login.archer.ac.uk. - Are you entering the passphrase correctly? You will be asked for your private key’s passphrase first. If you enter it incorrectly you will usually be asked to enter it again, and usually up to three times in total, after which ssh will fail with
Permission denied (publickey). If you would like to confirm your passphrase without attempting to connect, you can usessh-keygen -y -f /path/to/private/key. If successful, this command will print the corresponding public key. You can also use this to check it is the one uploaded to SAFE. - Are permissions correct on the ssh key? One common issue is that the permissions are incorrect on the either the key file, or the directory it’s contained in. On Linux/MacOS for example, if your private keys are held in
~/.ssh/you can check this withls -al ~/.ssh. This should give something similar to the following output:
        $ ls -al ~/.ssh/
        drwx------.  2 user group    48 Jul 15 20:24 .
        drwx------. 12 user group  4096 Oct 13 12:11 ..
        -rw-------.  1 user group   113 Jul 15 20:23 authorized_keys
        -rw-------.  1 user group 12686 Jul 15 20:23 id_rsa
        -rw-r--r--.  1 user group  2785 Jul 15 20:23 id_rsa.pub
        -rw-r--r--.  1 user group  1967 Oct 13 14:11 known_hosts
The important section here is the string of letters and dashes at the start, for the lines ending in ., id_rsa, and id_rsa.pub, which indicate permissions on the containing directory, private key, and public key respectively. If your permissions are not correct, they can be set with chmod. Consult the table below for the relevant chmod command. On Windows, permissions are handled differently but can be set by right-clicking on the file and selecting Properties > Security > Advanced. The user, SYSTEM, and Administrators should have Full control, and no other permissions should exist for both public and private key files, and the containing folder.
| Target | Permissions | chmod Code |
| Directory | drwx------ | 700 |
| Private Key | -rw------- | 600 |
| Public Key | -rw-r--r-- | 644 |
chmod can be used to set permissions on the target in the following way:
chmod [code] [target]. So for example to set correct permissions on the private key file id_rsa_ARCHER one would use the command chmod 600 id_rsa_ARCHER.
Unix file permissions can be understood in the following way. There are three groups
that can have file permissions: (owning) users, (owning) groups, and others. The available
permissions are read, write, and execute. The first character indicates whether the target
is a file -, or directory d. The next three characters indicate the owning user's permissions. The
first character is r if they have read permission, - if they don't, the second character
is w if they have write permission, - if they don't, the third character is x if they
have execute permission, - if they don't. This pattern is then repeated for group, and
other permissions. For example the pattern -rw-r--r-- indicates that the owning user can
read and write the file, members of the owning group can read it, and anyone else can
also read it. The chmod codes are constructed by treating the user, group, and owner
permission strings as binary numbers, then converting them to decimal. For example the
permission string -rwx------ becomes 111 000 000 -> 700.
Password
If you are having trouble entering your password consider using a password manager, from which you can copy and paste it. This will also help you generate a secure password. If you need to reset your password, instructions for doing so can be found here.
Windows users please note that Ctrl+V does not work to paste in to PuTTY, MobaXterm, or PowerShell. Instead use Shift+Ins to paste. Alternatively, right-click and select ‘Paste’ in PuTTY and MobaXterm, or simply right-click to paste in PowerShell.
SSH verbose output
Verbose debugging output from ssh can be very useful for diagnosing the issue. In particular, it can be used to distinguish between problems with the SSH key and password - further details are given below. To enable verbose output add the -vvv flag to your SSH command. For example:
ssh -vvv username@login.archer.ac.uk
The output is lengthy, but somewhere in there you should see lines similar to the following:
debug1: Next authentication method: publickey debug1: Offering public key: RSA SHA256:debug3: send_pubkey_test debug3: send packet: type 50 debug2: we sent a publickey packet, wait for reply debug3: receive packet: type 60 debug1: Server accepts key: pkalg ssh-rsa vlen 2071 debug2: input_userauth_pk_ok: fp SHA256: debug3: sign_and_send_pubkey: RSA SHA256: Enter passphrase for key ' ': debug3: send packet: type 50 debug3: receive packet: type 51 Authenticated with partial success.
Most importantly, you can see which files ssh has checked for private keys, and you can see if any key is accepted. The line Authenticated with partial success indicates that the SSH key has been accepted, and you will next be asked for your password. By default ssh will go through a list of standard private key files, as well as any you have specified with -i or a config file. This is fine, as long as one of the files mentioned is the one that matches the public key uploaded to SAFE.
If you do not see Authenticated with partial success anywhere in the verbose output, consider the suggestions under SSH key above. If you do, but are unable to connect, consider the suggestions under Password above.
The equivalent information can be obtained in PuTTY or MobaXterm by enabling all logging in settings.